Search the Community
Showing results for tags 'first'.
Found 2 results
-
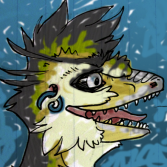
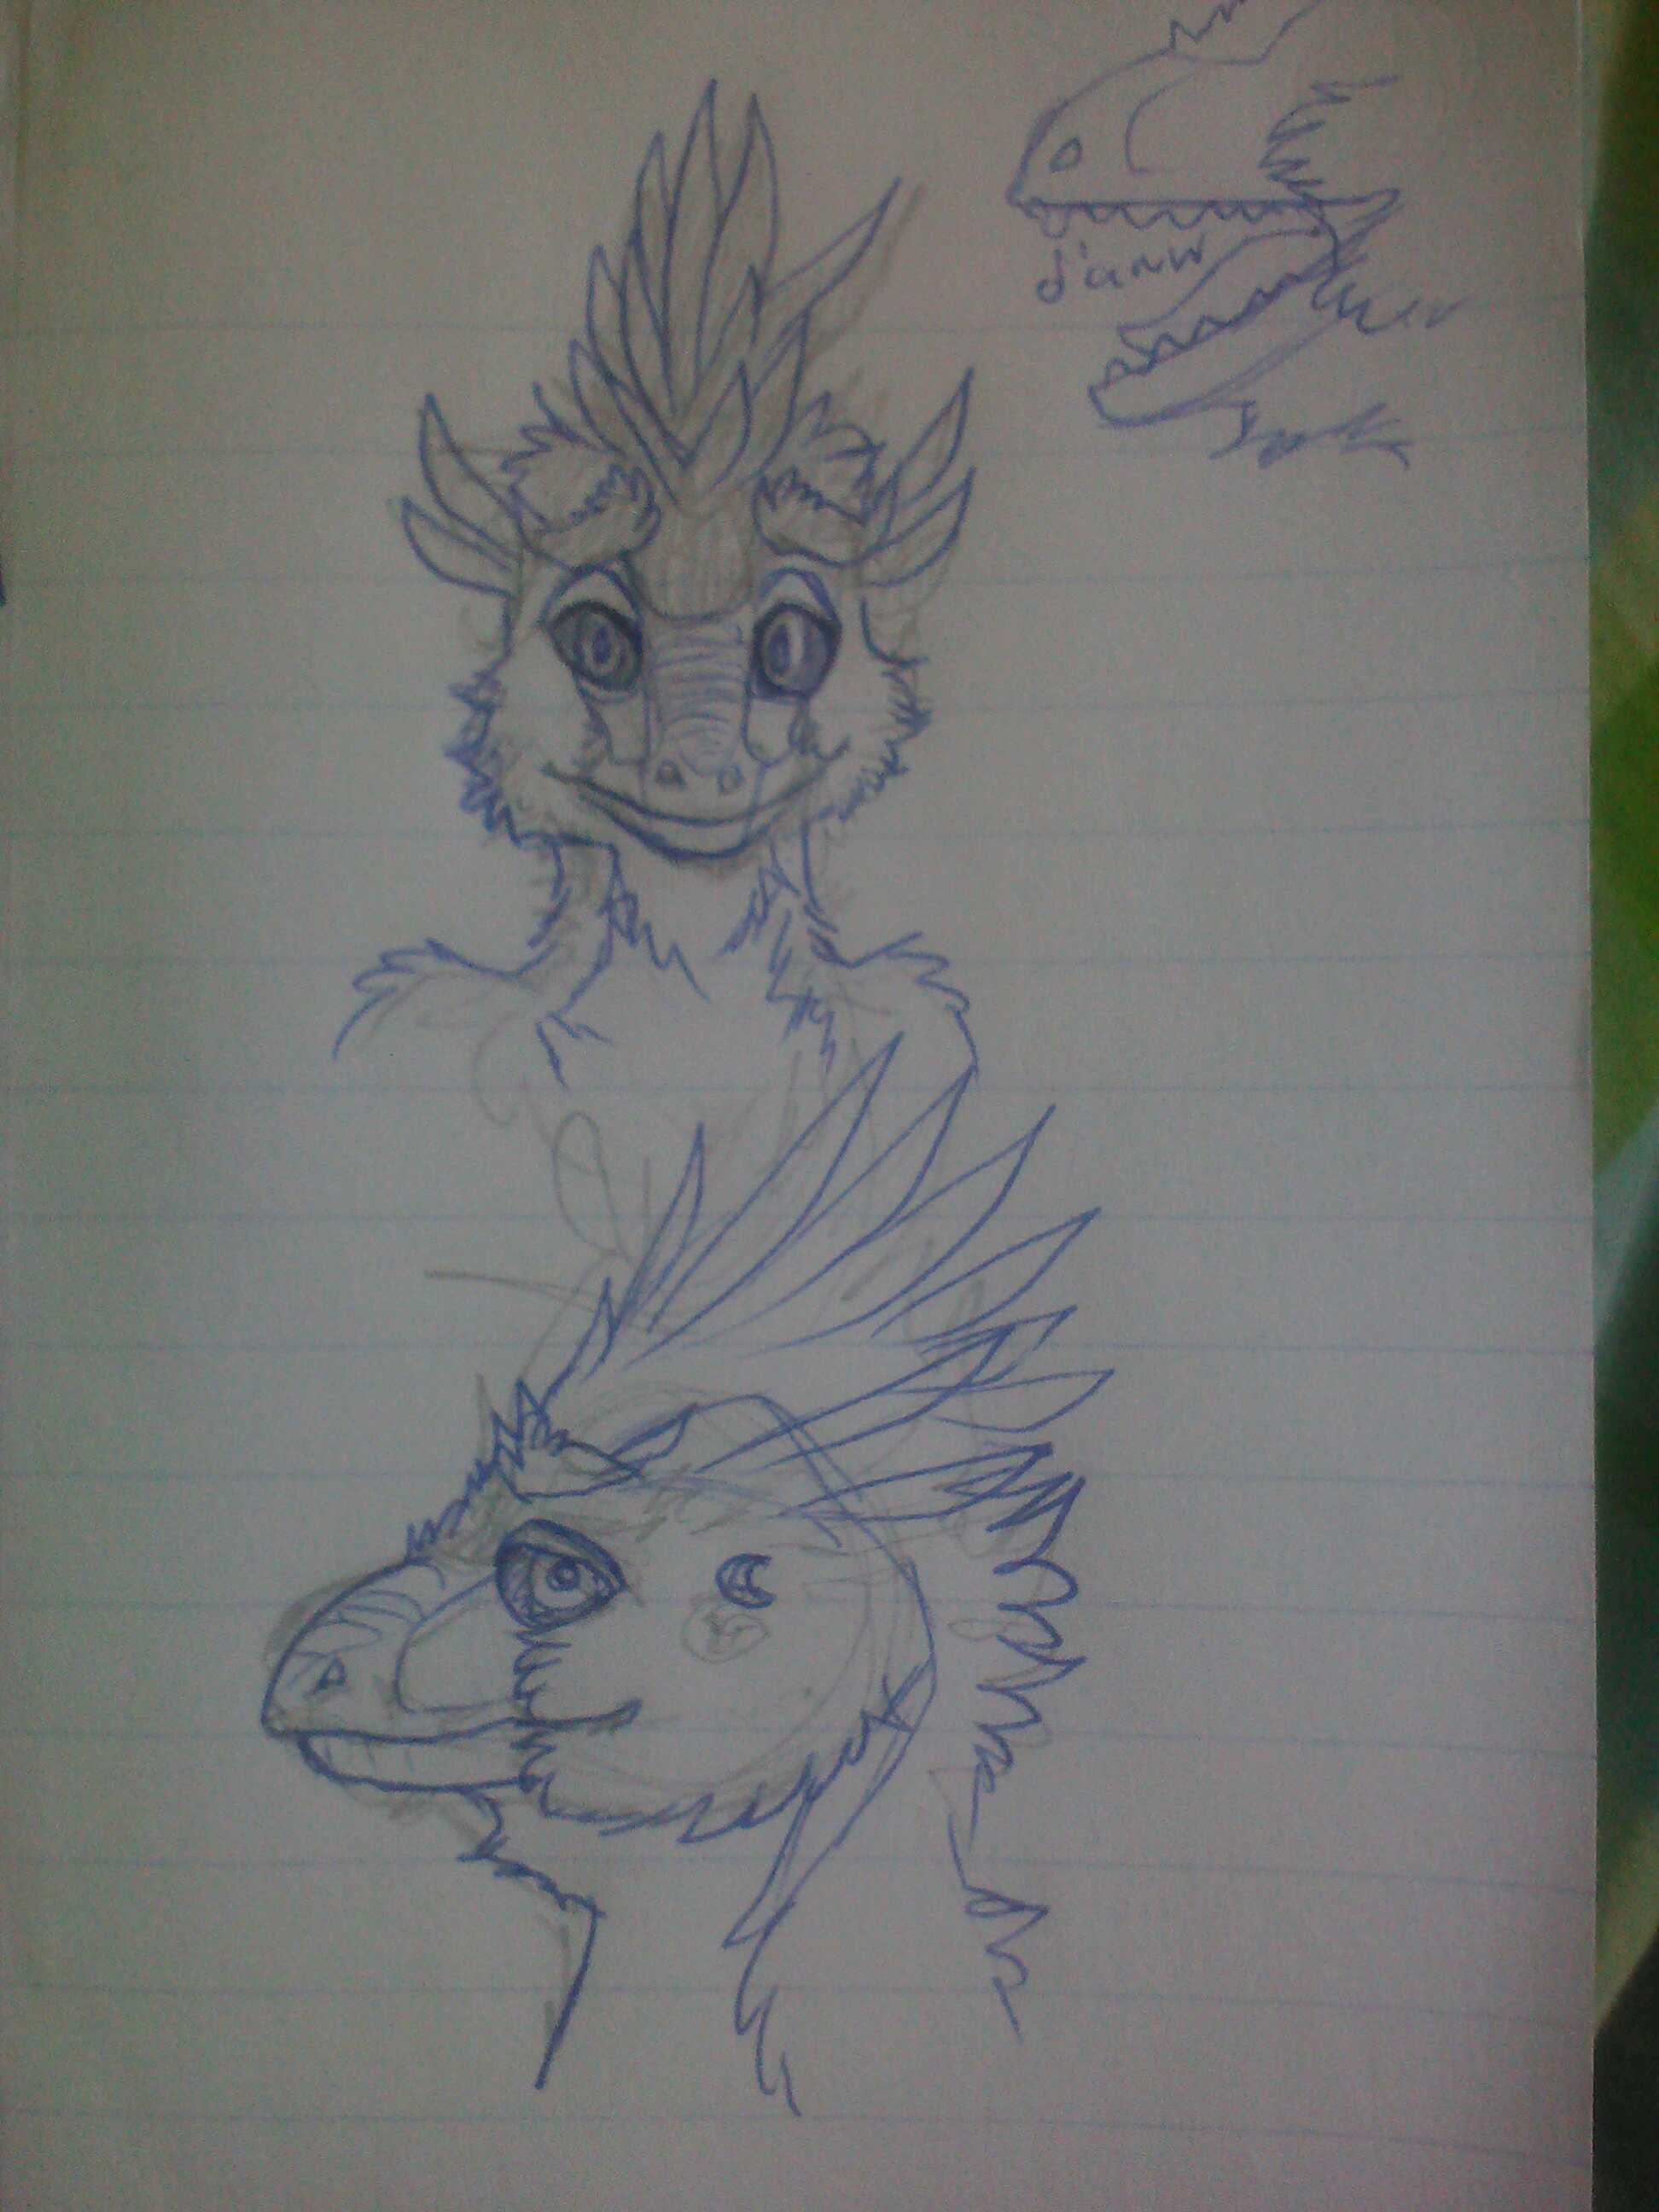
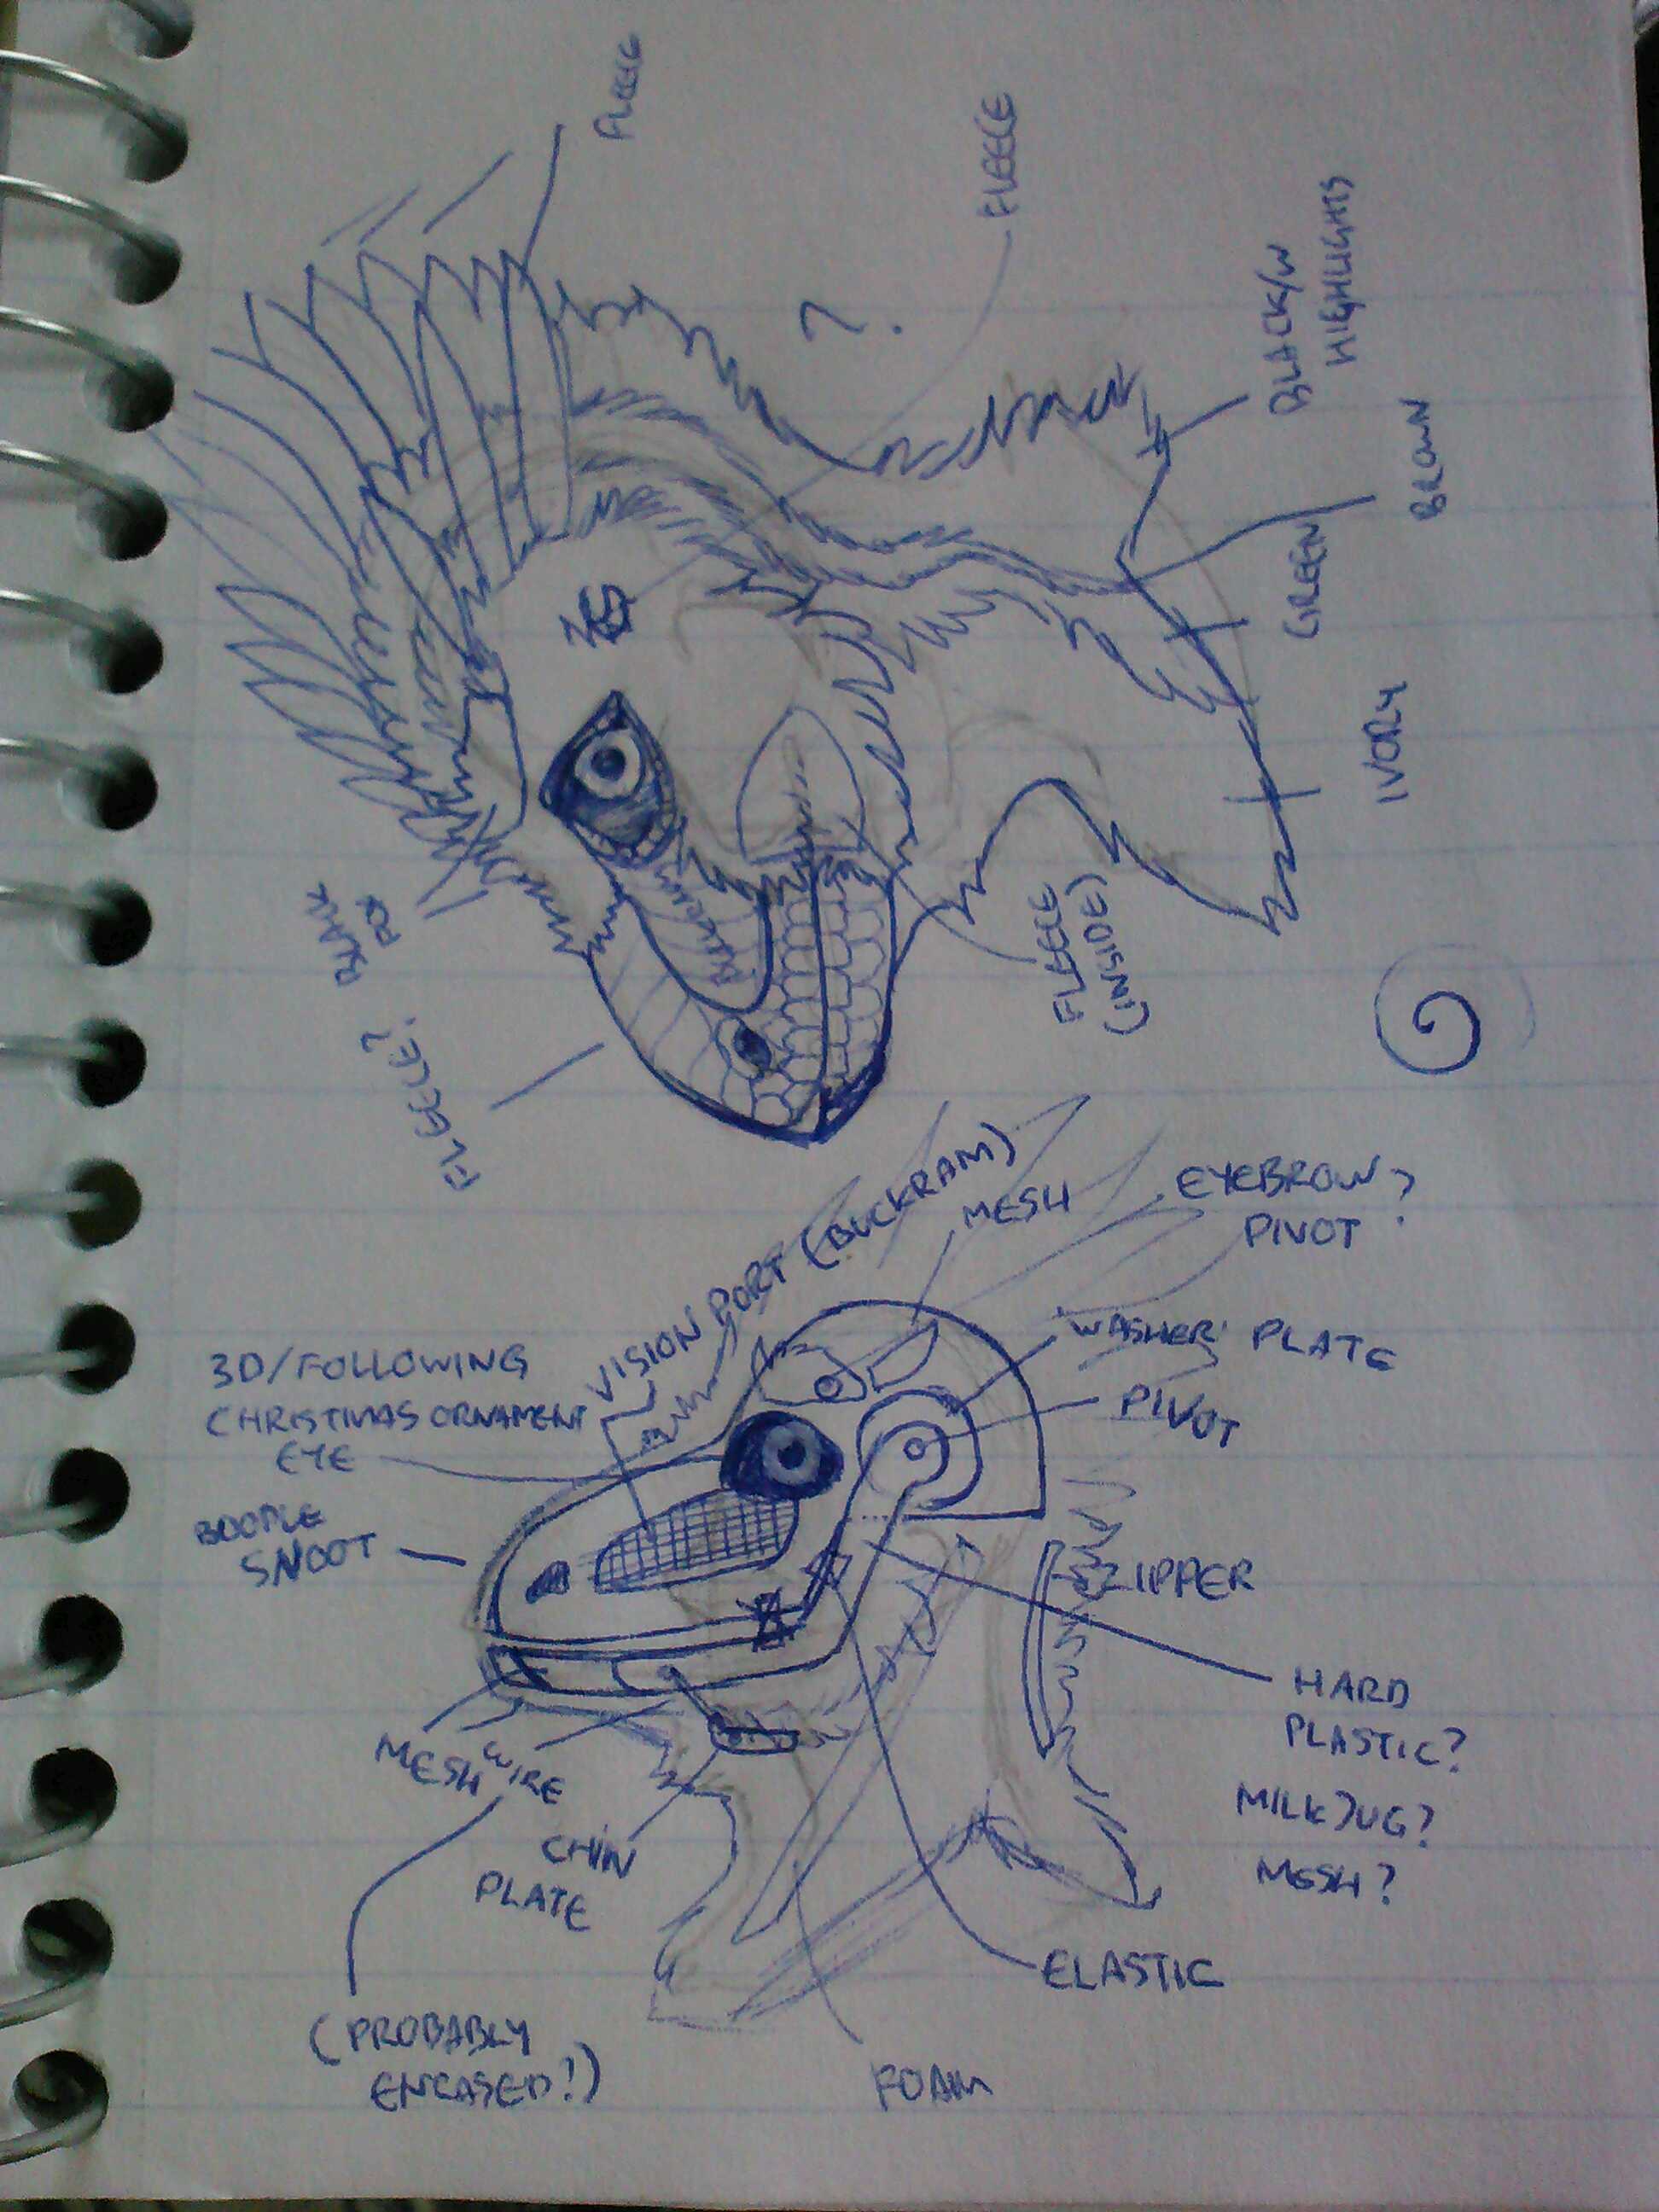
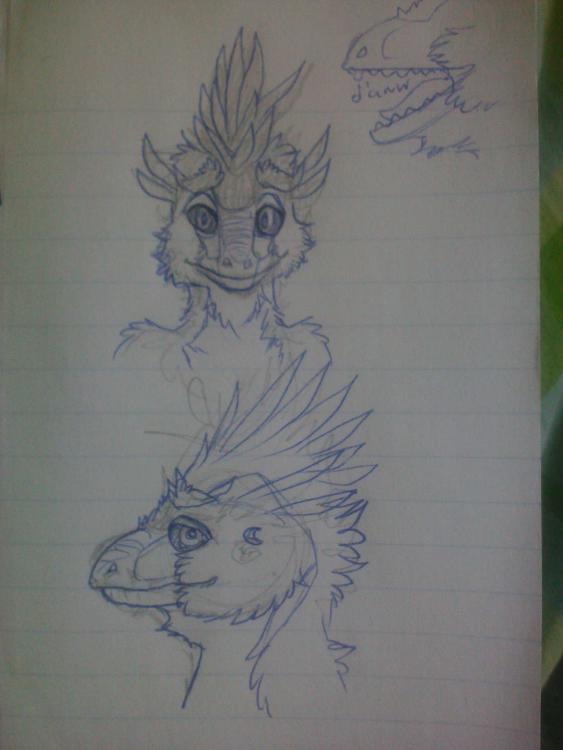
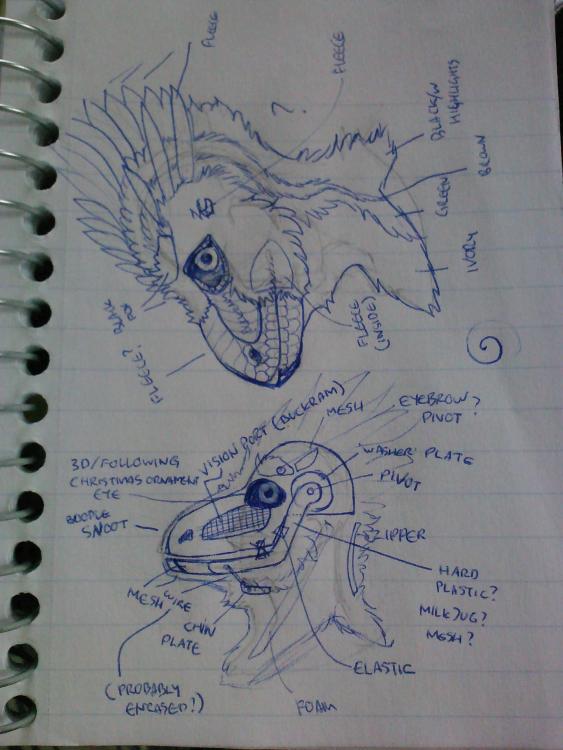
I'm building my first fursuit, and I thought ynz guys might like to see how it's done, for reference or whatever. I'm by no means a professional, yet. So here's the photos I took along the way building Littlerock, the archaeopteryx. They're not yet finished, but I intend to update the thread with continuation posts as I keep building. This post will focus on the head; a semi-toony balaclava-base with green foam and elastic build. It features a moving jaw and follow-me toony eyes. First off, it's very important to have a rough idea of what you're going to build. Draw it, detail it with how you're going to build it. This will give you a reference to look back on and double check each step in the building process to make sure you haven't forgotten any important details, but you may find yourself deviating somewhat from your plans while you learn. That's okay! Do what you gotta do to make it good. Suffice to say I did not follow my own blueprints entirely, for a variety of reasons. Live and learn. Next, gather your materials. In this case, I need three colors of fleece, some type of sculpting material, green high-density foam, plastic sheet canvas, three colors of faux fur, buckram, a balaclava, nylon leggings, a zipper, stiffened felt, some 1" wide woven elastic, sewing and hot glue supplies, sheet foamie, acrylic paint, buckram, a mannequin head, toothbrushes, and a slicker brush. Supplies I gathered and never needed include; a clear plastic Christmas ornament, heavy plastic and spring for the jaw mech, and a pivot mech for the eyebrow. All told this cost somewhere around $200, but many of the supplies are sufficient for the rest of the costume, and the tools are reusable. The entire partial will likely cost me around $230, however it's not a padding-heavy design, and it's being built for a surprisingly small person. Me. I'm tiny af. Starting This is the initial foam work, the very basis, and most basic point. Nothing fancy, nothing set in stone. The elastic is measured as a loop that goes around the wearer's chin, and around the back of the head. Another piece attaches to this, going over the top of the head from cheek to cheek. This is both the movement mechanism for the jaw, and the tension that keeps the head largely in place on the wearer. This elastic is sewn to the balaclava, while on a mannequin head. Make sure your mannequin is the same dimensions as your own head! They can be altered by shaving down and building up with foam. Measure your own head before beginning. Now start adding foam! Green foam can be cut with boxcutters, scissors, and those weird motorized turkey carvers. Attach it to things, including more foam, with hot glue, or other approved adhesives. I'd used a high-temp glue gun for this project. Initial foamwork will look rough, blocky, and generally ugly as all sin. That's okay! It's supposed to. You're only laying down the basics here. Essentially, I just kept adding foam in thin sheets and small chunks and nibbling away at it with scissors until I liked where it was going. Keep checking for symmetry, and remember, if you mess something up, it's ALWAYS BEST to remove the issue, and fix it. That's just part of the process, accidents happen. Keep going, but make sure you take frequent breaks, get up and move around. If you've been at it for hours, get sleep. A refreshed brain builds better, and makes more sensible decisions about how to approach a project, and it's great for your body and mind to pause the project for a moment, clean up whatever mess you've made, and move about for a bit. Try the head on, check it in the mirror, make sure everything's seated correctly, moving appropriately, and comfortable. This is essential to being happy with your project. After you have the face roughed out, try making mock-up eyes. These will help you to decide a number of things, including what size and shape they need to be, if you need to adjust the eyesockets (I clearly needed to, lmao), and what angle you need to place them in to insure a not-derp look. Bear in mind that you need to be able to see out of these, and if you need room for glasses, adjust accordingly. If you're making a more realistic suit, with resin eyes instead of toony ones, the vision ports will NOT be the eye itself, as you cannot see through resin eyes. Most builds including resin eyes have tear-duct vision ports. Build accordingly! So at this point, I jumped ahead and made good eyes, which eventually get re-painted and re-positioned several times. I used the cardboard template and made the same, in duplicate, out of sheet foamie. I also cut out the iris and pupil area, painted and glued in buckram irises. I see through these. The eyesockets in the photo here still needed adjusting, which i do get to later. From here, I began the mouth. It is lined with pink fleece, painted with acrylic paints, applied with brushes and dried slowly with toothbrushes. The teeth are Crayola Model magic, which, in hindsight, was a mistake. It's rather fragile, and takes on particles pretty easy, but it fit the bill of being easy to shape, cheap, and very lightweight. Each was painted and sealed with a clear topcoat. The tongue is carved from more green foam, and covered with more pink fleece and paint. So far, nothing here is sewn, everything is glued in place with hot glue. At some point, I added a temporary vision port between the eyes. I left it in the final for ventilation, but it doesn't provide much. The nostrils are liked with more fleece, since they're actual holes. I intended on installing an altered bird call into the roof of the mouth, but I never did. I cut the fleece inside the mouth ENTIRELY too close, and ended up working around it in later steps with another layer. Living and learning continues. Fleece is also glued around the eyes, to hide the green foam in the eye sockets, as well as glue holding the eyes in. Next, the roof of the mouth was made and installed. It is a traced-to-fit piece of plastic canvas mesh, glued in place, and covered with more pink fleece, which was then painted. The empty can of soda is there to keep the mouth open, and paint off of the lower teeth. Added top teeth and painted them after the paint dried on the roof of the mouth. More fleece is added in the back of the mouth to cover green foam and keep the illusion going. More paint is applied accordingly. The inner cheek muscle here was a challenge. It is vital for anatomical reasons, and it also hides the wearer's face. Initially, I used a bit of fleece, but it proved to be entirely too bulky, and impaired the jaw from closing properly. Instead, I painted a gray pair of nylon leggings, cut to shape, and glued in place. The nylons prove stretchy enough to hold their shape without being wrinkly or bulky. More foam work occurred around the wearer's ears here. I wanted to have excellent hearing while in suit, so rather than foam over the ears, I instead foamed carefully around them, and glued in a bridge of buckram over the gap. It is strong enough to hold the faux fur in it's proper shape, and breezy enough to hear through, as well as help with ventilation. Somewhere around here, I also adjusted the eyesockets' foam work as well, snipping out a small piece to pull the eyes closer together, and shaped more above the eyes. Time for a huge mistake! The entire face of this head is fleece, which is notorious for showing seams, so I did my damndest to make it of the fewest number of pieces. The bottom jaw I attempted to make of two pieces, which ended up looking hillariously bulky and generally stupid. I ripped it off shorty after taking these photos and replaced it with two differently cut pieces, pulled and glued very tightly. Now that a better job is on the bottom jaw, it's time for the pattern. Brown packing tape, and plastic wrap. Packing tape won't stick terribly to bare foam, so it doesn't need to be lined there, but the rest of the head needs plastic wrap liner. This tape is then carefully marked for sewing seams, and is cut off. Note that the mouth is open for this, to make sure there will be plenty of material around the cheeks, as to not restrict movement. You can also see that the face is all one piece. I did end up making seams around the nostrils, but they're well hidden by the overall shape of the foam, and generous paint. Here we have the new lower-jaw cover, as well as the face all attached. The eyes glued down shut looks like absolute nightmare fuel, yes. Opened them up vary carefully with snips, glued the lids into place, and continued. I ended up adding two strips of fleece beneath the eyelids for more character. No sewing yet, this is all glue work. Paaaainting, begin! Drybrushing, (aka paint on a brush, rather than airbrushing,) on fleece takes a bit of practice, so if you're gonna go there, practice on something else first. Brush it into the fibers with stiff bristles, like toothbrushes, and don't let it dry in chunks. Overly-thinned paint will bleed through the cloth and stain the material beneath the fleece's nap. Be careful! Now for the rest of the pattern. I know it's tempting, but do. NOT. use cheap faux fur. Acceptable fur usually runs $20/y and higher, cheaper fur looks, feels, and wears terribly. Cheap fur cannot be trimmed and shaved down like good fur, and it tends to fall apart much easier, as well as failing to accept paint like good fur. It's worth the extra money. The fur I'm using here is from Distinctive fabrics, ivory, black, and camel 2" shag. I'm pretty sure the ivory is discontinued now. I bought it ages ago. Leave a good quarter inch seam allowance on the edge of each piece, and 'mile markers', those dashes that cross over seam lines on each seam help to align each piece while sewing, so that curves are made, and edges line up properly. They should be marked on the cloth itself as well! Make sure the nap direction of the fur is going in the correct direction for each piece by drawing an arrow showing such on each pattern piece before removing. The hood, the part which covers the head, and the cape, the part which covers the neck and collarbone, are sewn with upholstery thread, using the best stitch ever; the blanket stitch. Heck yes. "Raw edges" of fur, where the backing is visible at the very edge of a cut piece, need to be hidden before attaching the hood and cape. I do this by hot gluing them down to the backing of the fur, very carefully, utilizing the quarter-inch to half-inch seam allowance left over during pattern cutting. Glue the hood and cape down fittingly after this part, sew it onto the balaclava where areas may take extra stress. Shaving and painting. Shaving is done with pet-fur clippers, and scissors. It's scary, but it's absolutely necessary to shaping the face and showing off the detail in your foamwork! Never clipper the fur down to the backing. Leave at least a quarter inch of fuzz. I'm also texturing the fur to resemble feathers, using scissors. Bear in mind that cutting any amount of fur is going to make a massive mess. Don't breathe it in. Painting faux fur is much easier than it seems like it would be. Acrylic paints, lightly thinned with water, are applied as necessary, and gently brushed through the fur with a slicker brush. Make sure to brush the fur occasionally while it dries to keep it from clumping. NEVER USE A HOT HAIR DRYER ON FAUX FUR. Heat ruins faux fur! You can use a fan, or a dryer on COLD, but never on HOT. The fur in these photos is still wet, and will go back to being fluffy when properly dry! At some point, I also made a pair of ears out of fleece and attached them to the head. No biggie. Feathers here were made of fleece, sewn like a sock, fitted over a piece of stiffened felt. I ended up making these much smaller than I initially planned, because it became difficult to control them past a certain size without wiring or hard plastic, and I wasn't ready to go there. More detail painting on and around these, and attachment of feathers. Some time later, I had a friend help me measure the cape, and I sewed and attached it along with a zipper, which runs from the nape of the neck down the cape. The zipper keeps the shape of the neck thin, while making the head easy enough to put on. It's black, hidden in black fur. That's about it, really. FIRST FURSUIT HEAD, COMPLETE!! Feel free to ask questions, post criticism, lollygag and whatnot! I'll be posting in this thread as I complete other body parts. The final piece will only ever be a partial, so on the to-do list are wings, and a tail. The feet are already done, but I'm unhappy with them and intend to re-do them entirely. Hope this is educational, if not entertaining.

-
So here is my first blog at this site. I never really wrote a blog before, just a series of random posts or news articles on my own site. So I am a programmer who favors PHP and enjoys MySQL database structure as well as some other flavors of web magic like javascript, Ajax, and JQuery just to name a few. I find it fun working on several projects and always dream up how to make something useful to someone. While I would say I've done well on the software I've created, I do think it always has room for improvement! One of my greatest strengths it seems is creating useful powerful staff/admin panels for managing things and bug fixes. Over 90% of all my bugs I find can be fixed within minutes. Of course, over more than half of the bugs are never even seen in the public as well. Now one of the worse bugs are security bugs. Security is obviously important to prioritize when you make code but many only first code something with "looks and functionality" in mind. Indeed, sometimes it is best to leave security to those who do nothing but eat, drink, and hardly sleep on nothing but security and how someone may break a system. I am no expert, but I do enjoy thinking of new things to make things as secure as possible without making the entry barrier too scary. The best way to really test it is to have someone else test it. It is easy to think of what to expect within your own realm of expectation but another user may be more crafty. Thing is, security can come in many different flavors but some are more effective than others and much of it only prevents "script-kiddies" and the like from breaking stuff. One of my latest things I've worked on is a way to replace passwords for a long-term future, or at least introduce something that can be a much stronger and additional layer of security at the very least. Security is always an interesting subject to think about. You have to really think outside the box and not within your own realm of limits and own software. You also have to expect some of your users will be morons. They will give away their information either willing or unaware via common everyday browsing or posting on other sites. You can control your user's security only as much as you give them rope. Which if you don't give them much, the range of predictability and desirability in a site close in on itself (do not think less is more!). No one likes remembering a password, or at least most common people do. What if you could simply just have some file on your computer and it would be your key to entry? The best example and easiest to make complex is an image. Now I know what many security aware are thinking. Mr. Fox is going to totally use some common image as his password and all hell will break lose for him! This is where this password system will get fun. Also from now on, I'd like to call my system "Scrypass". Now you have this image, right? Even if you picked like your ref sheet (bad idea perhaps) you MERELY need to change one pixel to screw up the combination in technical terms of this password. You can simply change the hue or even the transparency and your scrypass would be totally different! You might even use the same image on all sites able to use this technology and lo and behold you change one pixel or even something like a different hue, we're talking about changing a character strength of 16,777,216 versus 94ish (if I recall). This means that changing one pixel is going to be quite difficult and making a "rainbow image" program will be completely out of the question if we use brute force protection and hash our image correctly with something like SHA2/3 or blake2 + salted user basis unique to that site. I mention blake2 because its hashing seems to work well with large files. I would of course like to do more experiments before I can deem the collision rating of the system near to or zero. Amazing, something like this would indeed make security much more convenient for user accounts. I don't know if something like this exists, but I do know that if it does or doesn't, I shall aim to make it more popular. Now here is where we can transform that security even further! Pins are usually easy enough to remember. Now think of an "additional layer" for the scrypass system that "crops" this image and part of that is also hashed into your user account. What we then have is an image that can be as unique as a family photo and 1k to 5k by 1/5k in width and length that also is used for this "pin" which means without the pin, the image is useless (protection against someone who stole your scrypass) but without the image this pin is also useless. And no typing would be needed, thus keylogging is pointless and only someone literally watching you point to cords of your image will be able to do what you've done (there are still problems with the system as it isn't flawless). Now I am not saying something like this will take storm anytime soon. Hell, users like things they are used to and fear change (why some people stay on a site even though its changed so much, like Youtube). But I am saying that it is definitely something that needs to be polished up and begin experiments to see something that will be the next generation for passwords. This isn't an end all to passwords, but at least it will be another option. One problem is that the user will need to keep a thumbdrive for their password if they are on the go a lot. Plus options outside of site login can be troublesome as well as some other concerns. I probably scared half of you away within the first two paragraphs. It is okay. I promise the next ones won't be so scary! The quick and easy version is: I wish to make an improved password system using files you can keep on your computer and not even have someone think twice about it being relevant to your account. You also won't have to worry about long passwords, as the more common images are 500X500 and up: this means for each pixel we add 16,777,216 new combinations possible! I hope this blog entry has been amusing for some.